Gmail's Lesser Known Features
Hidden Features in Gmail


Which type are you? Personally, I cannot stand to have any notifications and I am the person on the left. If my inbox had thousands of unread emails, I'd have to go through every notification until they are cleared. I have to open emails to show they are read. 95% of the time, I am able to find the new email after I've read it thanks to some lesser known gmail features. The other 5% of the time is a struggle to find that missing email, but that's another story. Today, we're going to look at some of these features that you may or may not know about to help organize your inbox.
1) Snooze
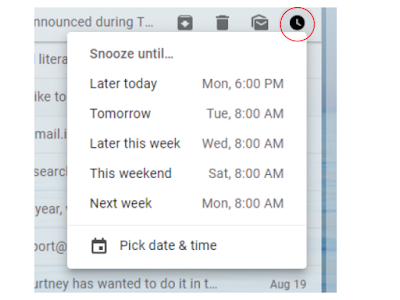
Obviously, we all like to snooze our alarms so that we can sleep just a little bit longer. The same concept applies to your emails. If you get an email over the weekend that you know you need to look at Monday, but don't want to open and reply to at that particular time, you can snooze it. Once you snooze the email, it will disappear out of your inbox until the date/time you choose for it to appear. Even if you opened it and read it, the email will return to your inbox as if it is unread.
When you hover over the email, there are 4 icons that appear on the right hand side of that particular email. Click on the one that looks like a clock. This will give you a drop down menu and you can choose one of the auto-generated dates and times or scroll to the bottom to choose your own date/time.
2) Labels
Just like you can create folders in Google Drive, folders can be created within Gmail. These folders are called labels. There are two different ways to create a label. One option is to use the left-hand sidebar, where the auto-generated labels are such as inbox, trash, drafts, etc. Click the more tab and scroll down until you find +create new label. You can create your new label name and choose to leave it as a separate label or nest it under another label.

The other way to create a label is to either click the checkbox next to the email in your inbox or open up the email. This creates an set of options at the top, such as delete, archive, snooze (yes, you can snooze emails from here too), etc. 
There are two buttons you will want to pay attention to:
- Move to

- Using move to will allow you to move the email into a previously created label OR create your own new label for the email.
- Labels

- Using labels will allow you to create a new label and give it to the specific email. However, this does not move the email into a new folder. For this reason, I don't use this button.
Once you create the label and move the email, it will now appear in the left side under inbox, starred, snoozed, etc. You can click on that label and you will find all emails that have been moved to that spot.

The other way to create a label is to either click the checkbox next to the email in your inbox or open up the email. This creates an set of options at the top, such as delete, archive, snooze (yes, you can snooze emails from here too), etc.
There are two buttons you will want to pay attention to:
- Move to
- Using move to will allow you to move the email into a previously created label OR create your own new label for the email.
- Labels
- Using labels will allow you to create a new label and give it to the specific email. However, this does not move the email into a new folder. For this reason, I don't use this button.
Once you create the label and move the email, it will now appear in the left side under inbox, starred, snoozed, etc. You can click on that label and you will find all emails that have been moved to that spot.
3) Filter Messages:
Emails can be sent directly to a labeled folder and bypass the inbox. For example, if it is a recurring newsletter from a specific person or company that you may want to read at a later time, you can label it and send it directly to that folder. - Either click the checkbox by the email in your inbox or open up the email.
- Check the top bar and click on the three dot drop down menu.
- Choose filter messages like these.
- If it is a specific email address you are filtering, it will automatically populate. You will have other options such as the subject, if it has an attachment, etc. Once you enter in these fields, if needed, choose create filter

- Upon choosing create filter, you will have a few different options. To have the email bypass the inbox to a folder, choose the following settings (outlined in red) and then click create filter. Under the categorize as option, click the drop down to put it under a specific label. Click the create button when you've selected your options and you're done!

Emails can be sent directly to a labeled folder and bypass the inbox. For example, if it is a recurring newsletter from a specific person or company that you may want to read at a later time, you can label it and send it directly to that folder.
- Either click the checkbox by the email in your inbox or open up the email.
- Check the top bar and click on the three dot drop down menu.
- Choose filter messages like these.
- If it is a specific email address you are filtering, it will automatically populate. You will have other options such as the subject, if it has an attachment, etc. Once you enter in these fields, if needed, choose create filter
- Upon choosing create filter, you will have a few different options. To have the email bypass the inbox to a folder, choose the following settings (outlined in red) and then click create filter. Under the categorize as option, click the drop down to put it under a specific label. Click the create button when you've selected your options and you're done!


4) Schedule Send:
Emails can be scheduled to send at a later date and time. This feature was a lifesaver for me during Virtual Learning. It meant that I didn't have to rush to get my computer turned on first thing in the morning (while chasing around a 1 year old) to send an email about the week's assignments. I wanted these emails to send to students and parents on Monday morning when the first assignments appeared, but didn't always have the time to get them typed up or sent first thing. Instead, I would type up the email at some point in the days before Monday and schedule it to send on Monday morning at 8:00 AM.
To schedule send emails:
- Type up your email.
- Instead of clicking send, click the arrow directly beside the send button.
- You will get a few auto-generated dates/time or you can choose to pick a specific date and time.
- Once you've picked your date/time, click schedule send.
- If you need to edit your email after you have scheduled it, the email will now appear in a folder titled scheduled. You can edit it here and can reschedule it for a different date/time if needed.
5) Chat/Hangouts:
Google Hangouts appears as a chat feature within your email. It usually defaults to show on the left side underneath the meet, but if it doesn't show on your email the setting will need to be turned on from your email. This is the Hangout app that can be opened separately on your computer as well as on your phone. I used it as a way to chat with students during Virtual Learning for any issues or questions that arose.
This can also be used if you need to ask another teacher a question who may in class at that time. **It can also be used to message me if you need any technology help during the school day!**
6) Gmail Sidebar:
The sidebar is typically hidden in your Gmail, but it features your calendar, tasks, and Google Keep (if you don't know about Google Keep, click here. It can be used as digital sticky notes and is a game-changer).
To show the sidebar, look in the bottom right corner for the left facing arrow. Click the arrow and the sidebar will appear with the icons for calendar  , Google Keep
  , and tasks
  .
.
 Click the option you want to show. My favorite option is the tasks feature, because you can make a to do list directly in your email. You can also add an email to your task list as a reminder to complete an activity. To do that, just find the add to task
  button in the top menu (within the email or when you click the checkbox). Clicking this button will send the information to you task list and can be checked off when completed.
There are many other features within Gmail that aren't as well known, but these are a few of my favorite ones to make your life a little more organized!
The sidebar is typically hidden in your Gmail, but it features your calendar, tasks, and Google Keep (if you don't know about Google Keep, click here. It can be used as digital sticky notes and is a game-changer).
To show the sidebar, look in the bottom right corner for the left facing arrow. Click the arrow and the sidebar will appear with the icons for calendar , Google Keep , and tasks .

Click the option you want to show. My favorite option is the tasks feature, because you can make a to do list directly in your email. You can also add an email to your task list as a reminder to complete an activity. To do that, just find the add to task button in the top menu (within the email or when you click the checkbox). Clicking this button will send the information to you task list and can be checked off when completed.
There are many other features within Gmail that aren't as well known, but these are a few of my favorite ones to make your life a little more organized!
Comments
Post a Comment